AI Video Generation for Game Cinematics and Cutscenes: Practical Workflows for Faster, Better Previs
AI video generation gaming cinematics becomes genuinely valuable the moment it saves you from wasting animation, edit, and render budget on a scene that was never working in the first place. The sweet spot right now is not pretending a prompt alone will replace your final cinematic pipeline. It is using fast AI motion drafts to block shots, test pacing, preview emotional beats, and build cutscene concepts you can actually react to before the expensive production phase begins.
Where AI Video Generation Fits in Gaming Cinematics Today

Use AI first for previs, not polished final cutscenes
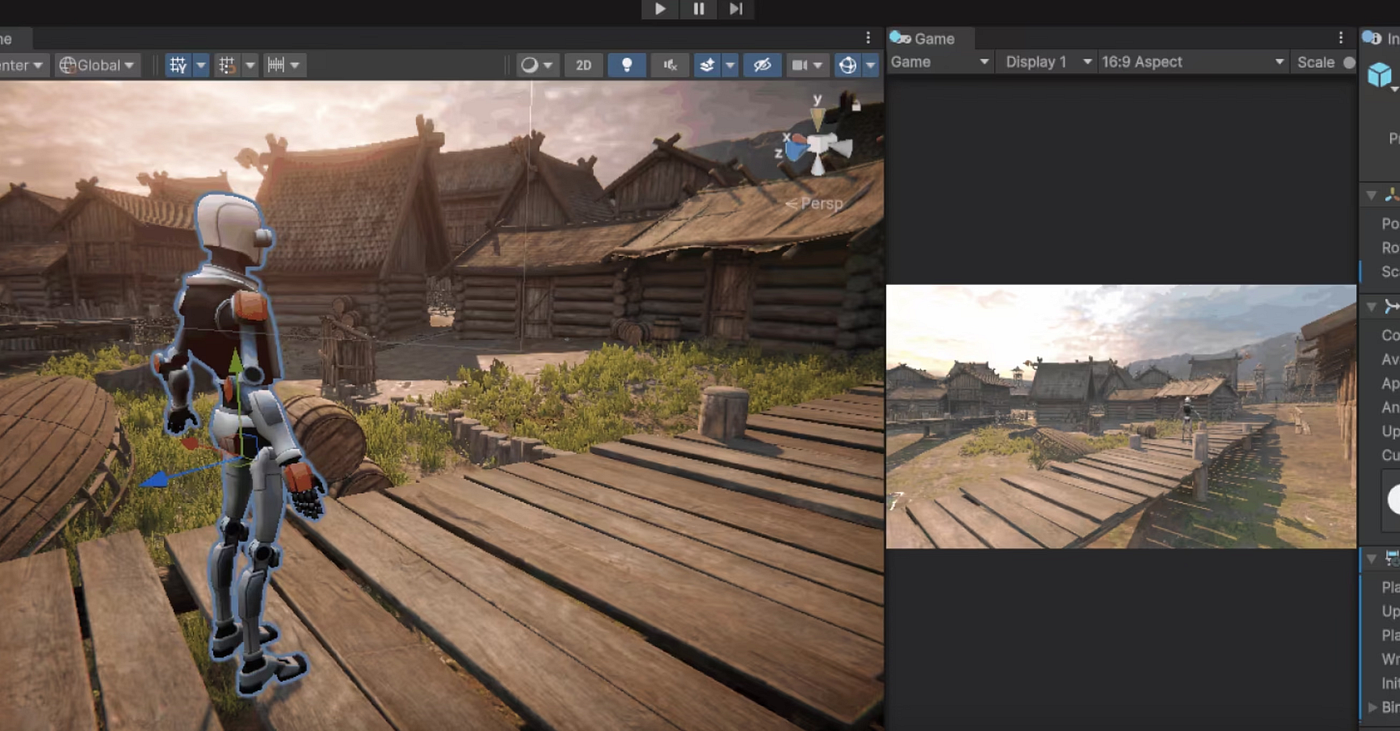
The strongest current use for AI video in game cinematics is previsualization. That means replacing static boards with moving shot drafts so you can evaluate timing, lighting direction, scene geography, and camera energy before committing to mocap, keyframe animation, layout, or rendering. The practical gain is simple: if a reveal shot feels flat in previs, it is much cheaper to fix the concept than to fix a near-final cinematic pass.
Filmmaking workflows around AI previs already point in this direction. AI-generated sequences are being used for scene planning, mood exploration, framing experiments, and pacing checks rather than as a one-click substitute for finished film output. That maps cleanly to game cutscenes. When you are building a boss intro, companion dialogue scene, or announcement teaser, you need to know whether the scene breathes correctly long before you care about final skin shading or hero-level facial polish.
The fastest wins: trailers, pitch videos, and internal scene tests
The easiest wins come from short-form assets where speed matters more than perfect continuity: internal cinematics tests, publisher pitch decks, trailer concepts, Steam page promos, teaser clips, and rough cutscene drafts. Genra.ai cites a benchmark of $4K–$6K per minute for professional game trailers, and that number is enough to explain why AI-assisted concepting matters. Even if AI never touches the final exported trailer, reducing rounds of wasted concept art, edit revisions, and abandoned motion drafts can save real money.
There is also a demand-side reason to care. Genra.ai reports that YouTube gaming content reached 8.8 billion hours watched in 2025. That is a massive incentive to build better promo video, sharper teaser hooks, and stronger cinematic previews. If a short AI-assisted prototype helps you find the cut that sells your game’s tone in the first five seconds, it has already done useful work.
The important distinction is between three outputs that often get lumped together. First, AI-generated previs is for internal planning: rough shot logic, camera movement, and scene timing. Second, marketing prototypes are more polished drafts used to pitch a trailer direction, test ad creatives, or assemble a teaser concept quickly. Third, final cinematics are still your in-engine sequences, bespoke animation passes, or pre-rendered shots produced through the normal quality-controlled pipeline.
That separation matters because it keeps expectations realistic. If you treat AI output as a planning layer, the value is obvious. You can rapidly test “slow dolly through burning temple,” “low-angle villain entrance with backlight,” or “over-the-shoulder confession beat with subtle push-in” and decide whether the scene language works. If you expect final shippable cutscene continuity from day one, you will spend more time fighting drift and artifact cleanup than improving the scene itself.
For most teams, the right move is to aim AI at the messy early stage where ideas are still fluid. That is where ai video generation gaming cinematics already pays off.
Best AI Video Generation Gaming Cinematics Workflows to Start With
Text-to-video for rapid scene ideation
Text-to-video is the fastest way to explore a scene when all you have is a script beat, a mood target, and a rough mental image. Use it when the main question is, “What should this scene feel like?” rather than, “Can this exact concept painting animate cleanly?” A short prompt can quickly test whether a throne room intro should feel ominous and slow, handheld and chaotic, or symmetrical and ceremonial.
This is where tools like Ludo.ai are useful in a practical sense, because its Video Generator supports text prompts as a direct starting point. That makes it good for first-pass ideation: generate three to five versions of the same beat with different camera positions, lighting setups, or emotional tone. Keep these clips short. Ten seconds of useful information beats forty seconds of muddy motion every time.
Image-to-video for concept art and keyframe animation tests
Once concept art, paintovers, or keyframes exist, switch to image-to-video. Ludo.ai also accepts a starting image, which is ideal when the art team has already locked a character silhouette, color palette, or environment layout. Instead of prompting from zero, you give the generator a stronger visual anchor and use motion generation to test camera movement, parallax, push-ins, environmental motion, or a dramatic transition between poses.
This method is especially effective for cinematic moments that already have hero art. If you have a splash image of the mech hangar reveal, animate from that image to test scale, lighting rhythm, and entrance timing. If you have a keyframe for a betrayal scene, use image-to-video to test how quickly the camera should creep in before the line lands. You are not replacing the concept artist. You are extending the usefulness of approved art into motion planning.
Video-to-animation for motion reference and game-ready output
The third workflow is video-to-animation, and it fills a different need. QuickMagic AI is positioned around turning “any video” into game-ready animations, which makes it relevant when you already have source footage and want motion reference or an animation base rather than a general-purpose cinematic clip. Think recorded acting, stunt blocking, phone-shot movement tests, or temp performance capture that you want to convert into something more directly usable by the game pipeline.
That is especially helpful for gameplay-adjacent cinematics where body motion matters more than visual spectacle. If a dodge, kneel, attack windup, or partner interaction needs to read correctly in-engine, source-video conversion can give you faster motion iteration than endlessly prompting for vaguely similar movement.
A simple decision framework keeps this clean. Use text prompts when you need rough ideation. Use image-to-video when concept art already exists and you want visual consistency. Use source-video conversion when the motion itself is the key reference and you need animation-oriented output.
The smartest test is to build one scene through all three methods. Start with a text-prompt version of the scene, then run an approved still through image-to-video, then capture basic live-action blocking and push it through a video-to-animation workflow. Compare them on speed, continuity, shot usefulness, and team comprehension. That side-by-side test will immediately reveal which method best fits your cinematic pipeline.
How to Plan AI Video Generation Gaming Cinematics for Consistent Scenes

Build style exemplars before full shot generation
Consistency problems usually start before the first clip is generated. If you begin with raw prompts and no visual guardrails, your sequence will drift shot by shot: costume details shift, lighting logic changes, proportions wobble, and environments stop feeling like one world. The better workflow is to establish style exemplars first. Research on AI storyboard generation specifically highlights creating style exemplars before story panels so visual language stays coherent from the first frame to the last.
In practice, that means assembling a compact look pack before you touch sequence generation. Pick three to six images that define your scene’s visual rules: lens feeling, contrast level, palette, texture density, atmosphere, and camera behavior. If the sequence is a neon-soaked alley confrontation, your exemplars should lock the blue-magenta lighting ratio, wet-ground reflectivity, costume edge highlights, and preferred framing style. Every later prompt and image input should point back to that set.
Create character reference sheets to reduce visual drift
Character drift is even more destructive than style drift, so build character reference sheets early. Research on AI storyboard workflows notes generating character reference sheets before story panels as a consistency step, and that is exactly how to keep a cinematic sequence usable. Create front, three-quarter, and profile references if possible, plus one emotional expression image and one action pose. Include costume notes, hair silhouette, prop placement, and height relationships.
When you prompt scenes, refer to the same descriptors every time. Do not alternate between “battle-worn ranger,” “hooded scout,” and “female archer hero” if they are meant to be the same person. Lock a canonical description, then reuse it. If your tool supports starting images, feed the same approved reference sheet or cropped portrait back into generation for every key shot.
AI-assisted storyboarding works best as acceleration for tedious planning, not as creative autopilot. One filmmaking-focused source on AI storyboarding makes the point directly: it helps speed repetitive tasks and isn’t here to replace filmmakers. In game terms, that means the director, cinematic designer, narrative lead, and editor still decide the emotional beat, the framing priority, and the gameplay tone. AI just gets moving images on the timeline faster.
A reusable pre-production checklist keeps scenes stable. Start with a shot list that states the objective of each shot. Add tone references so everyone is aiming at the same emotional register. Prepare a character look sheet and environment references. Include camera notes such as lens feel, angle, movement, and screen direction. Finish with pacing goals so shots are generated at the right rhythm rather than stitched together from mismatched tempos.
Lock these visual rules before full generation. If your first frame says “grounded stealth thriller” and your last frame says “hyper-stylized fantasy promo,” the sequence has failed even if individual clips look impressive. The goal is not isolated cool shots. It is a scene that feels like one cinematic moment.
Tools and Features to Compare for AI Video Generation Gaming Cinematics
What matters most: length, resolution, input type, and control
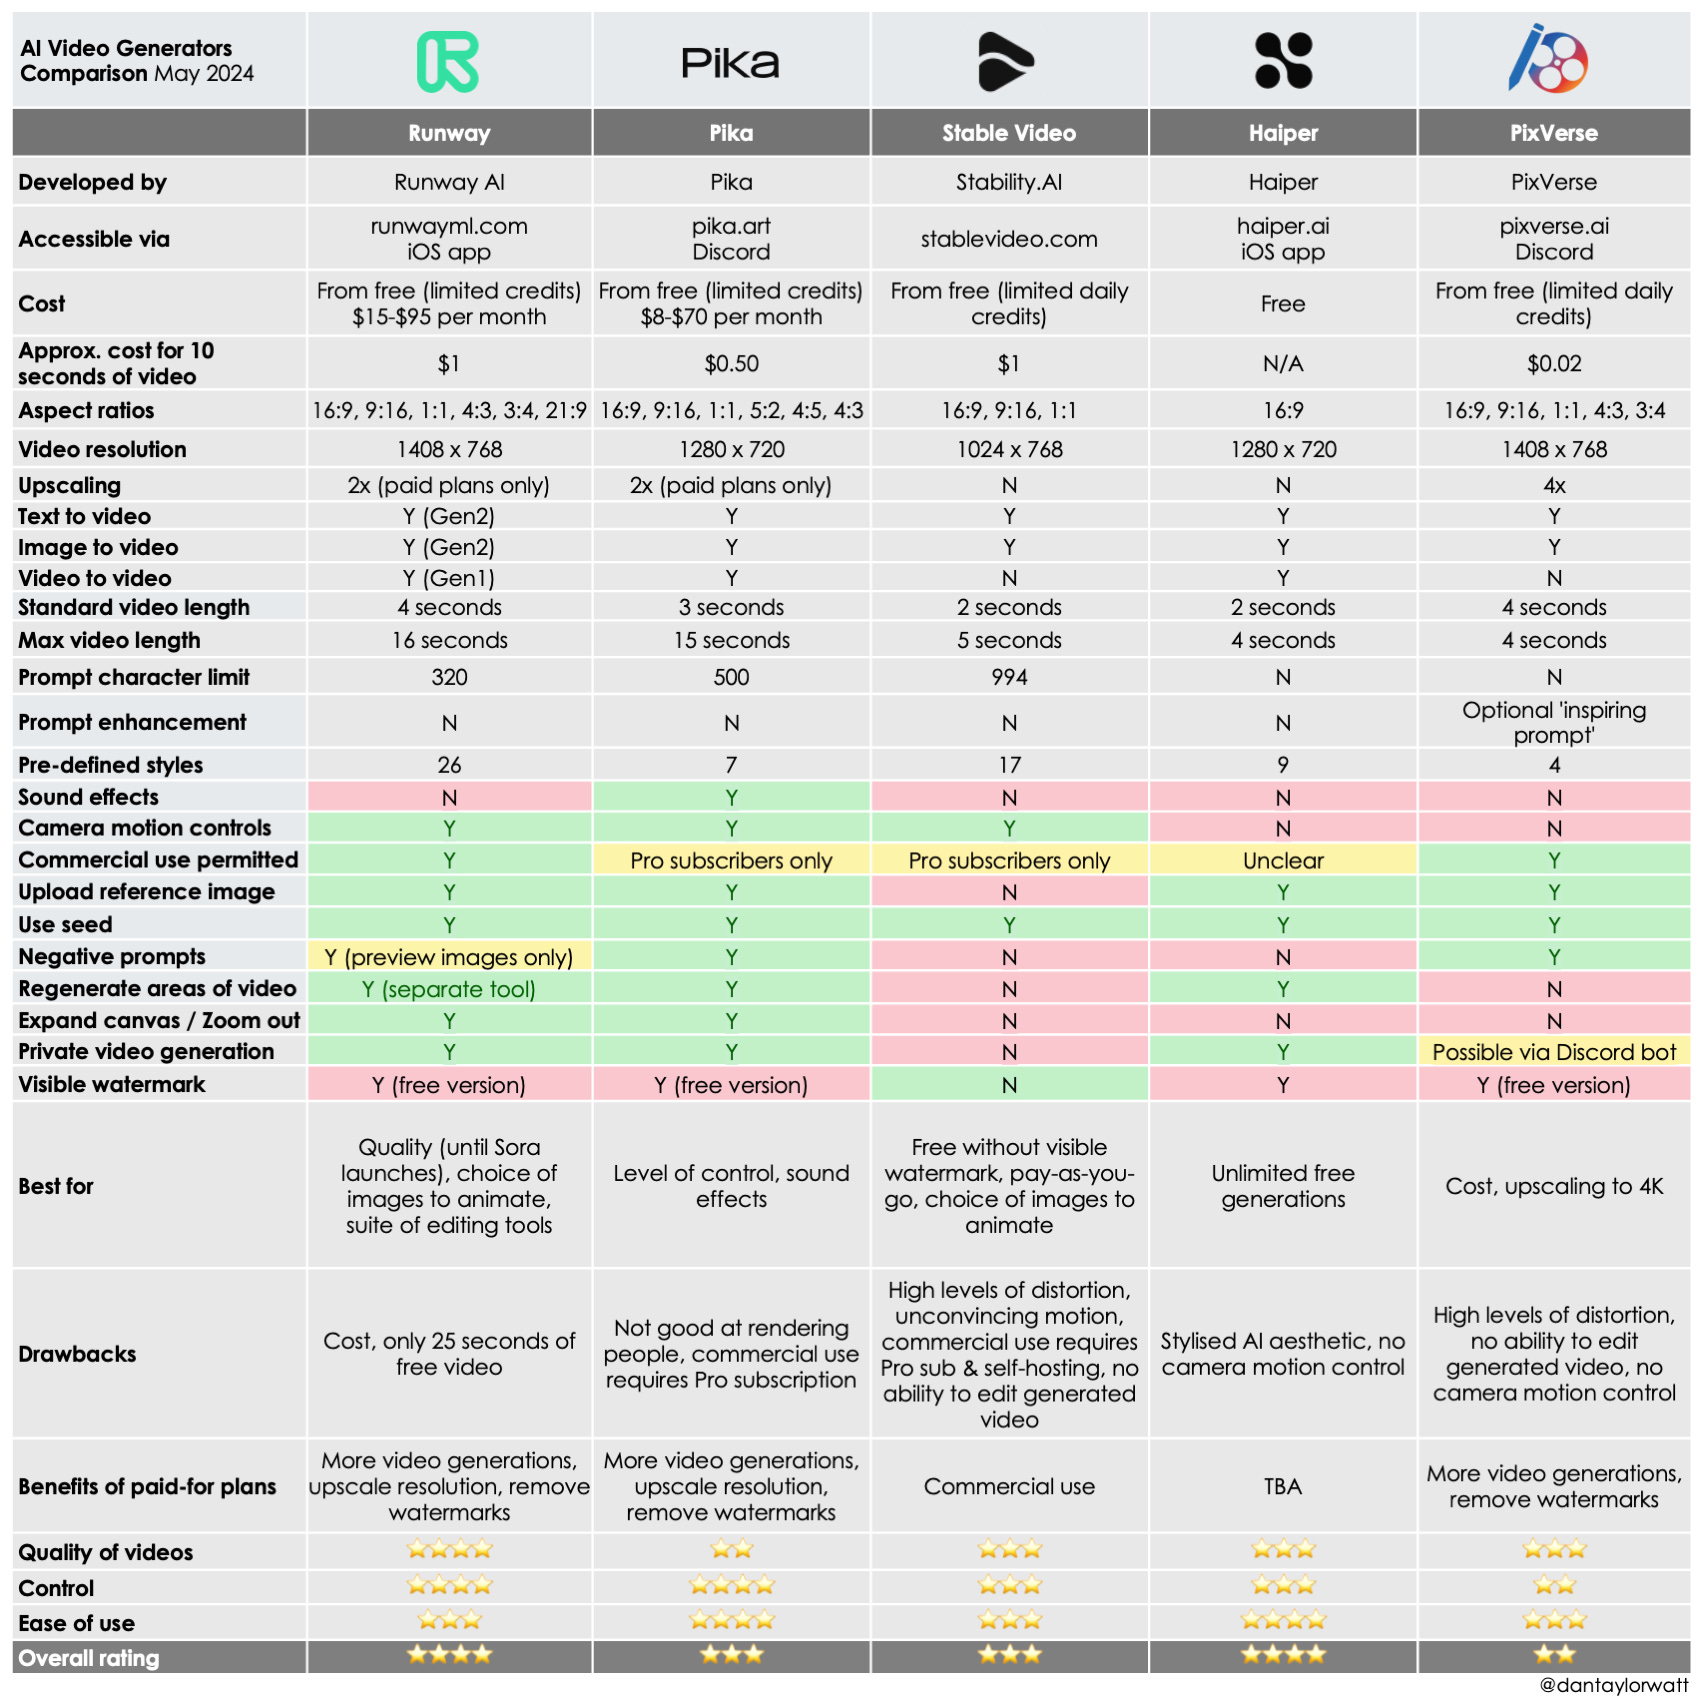
When comparing tools for cinematic previs, the first question is not brand hype. It is whether the tool can produce clips that fit the way your team actually works. The core checklist should include shot duration, resolution, input type, and control over results. If a generator only makes very short clips, that may still be perfect for shot ideation but weak for dialogue pacing tests. If resolution is low, it may be fine for internal boards but poor for a pitch deck. If input options are limited, it may not fit a concept-art-led workflow.
Length matters because cinematic beats need room to breathe. According to Lummi’s roundup, Kling AI can generate highly realistic 1080p videos up to two minutes long from a single prompt. For game teams, that makes Kling worth testing for short cinematic prototypes, trailer blocks, and mood sequences where you want more than a couple of seconds to evaluate pacing. Even if you only use a fraction of that duration, the ceiling is useful.
Examples of tools worth testing for game cinematic use cases
Ludo.ai stands out as a practical option because it explicitly supports both text-to-video and image-to-video inputs. That means you can move from rough prompt ideation to concept-art-driven motion testing without jumping tools immediately. For teams already sitting on key art, that flexibility matters more than raw novelty.
Genra.ai is also relevant because it positions itself as a free AI video generator and agent with “chat to video” aimed at creators. The supplied source material only confirms that positioning and the pricing angle, so treat it as a tool to test rather than a fully verified production recommendation. Still, for early-stage trailer ideation or budget-conscious promo drafts, chat-driven generation may be useful if the output speed is good enough.
QuickMagic AI fits a different slot. Its value is not generic cinematic prompting but the promise of turning video into game-ready animations. That makes it a stronger candidate for motion reference conversion, prototype animation blocking, or game pipeline support than for pure beauty-shot generation.
Wan2GP should be treated carefully. It is described in a source title as a free PC-based AI video generator with no subscriptions or limits, but those claims were not technically verified in the raw material. Use it as an unverified lead, not a confirmed production dependency. Validate output quality, hardware demands, stability, and licensing before you build any workflow around it.
This is also the point where related searches become useful, especially if you want more ownership over your stack. Terms like open source ai video generation model, open source transformer video model, image to video open source model, and run ai video model locally matter when you need privacy, repeatability, or lower long-term cost. Queries around happyhorse 1.0 ai video generation model open source transformer may surface experimental options, but always verify maturity, documentation, and support before betting a pipeline on them. The same goes for open source ai model license commercial use: check the license yourself before using any model for commercial trailer or cutscene work.
Use one comparison sheet for every tool test: shot duration, prompt fidelity, style consistency, camera control, export quality, and pipeline fit. If a tool cannot survive that checklist, it is a toy for your use case, not a workflow upgrade.
Step-by-Step Production Pipeline for AI Video Generation Gaming Cinematics
From script beat to animatic
A reliable pipeline starts with the scene objective, not the tool. Define exactly what the scene must accomplish. Is it introducing a faction leader, foreshadowing a betrayal, confirming a gameplay objective, or selling the emotional cost of a mission? Once that is written in one sentence, break it into shot beats. Each beat should describe what changes for the viewer: reveal location, establish danger, isolate protagonist, show enemy silhouette, land reaction, transition to gameplay.
Next, prepare references. Pull your style exemplars, character sheets, environment art, and camera references into one folder for the scene. If the team already has concept art, mark which frames should feed image-to-video generation. If body mechanics are important, record simple source video for later animation conversion.
Then generate variations, not finals. For every beat, create multiple short clips with controlled differences: one wide shot, one medium push-in, one more dramatic lighting pass, one calmer version with slower camera motion. AI-generated clips are most useful here because they can replace static boards and let you test mood, lighting, pacing, and framing much earlier than a normal cinematic pass would allow.
Pick the best clips and cut them into an animatic immediately. Do not wait for perfect outputs. A rough sequence on a timeline will expose bad rhythm faster than reviewing isolated clips in a folder. Once assembled, adjust shot order, trim clip lengths, add temp sound, and check whether the scene’s emotional logic actually lands.
From animatic to trailer draft or cutscene prototype
After the animatic works, push toward a more usable prototype. Replace weak clips with better variations, standardize visual style where possible, and refine transitions between beats. If the sequence is for a trailer concept, tighten the openings and exits of each clip so the editor can cut to music naturally. If it is for a cutscene prototype, spend more time on continuity of eyelines, staging, and gameplay tone.
At this stage, AI output is strong enough for several practical uses. It can support internal approvals, helping leads react to a moving scene instead of reading boards. It can support publisher pitches, especially when you need to communicate ambition without building final shots. It can support Steam page trailer concepts, where a short cinematic draft helps define how the store video should open. It can also support early cutscene timing checks, making sure dialogue, pauses, and gameplay handoff points feel right.
Keep a human review pass at every stage. Someone needs to check continuity, narrative clarity, performance readability, and whether the scene still feels like your game rather than a generic AI montage. Have the cinematic lead or editor review every version for camera logic. Have narrative review the clarity of emotional beats. Have gameplay review whether the cinematic tone matches what the player actually experiences.
The output of this pipeline is not just a nice-looking test video. It is production direction. Once the animatic or trailer prototype is approved, your team knows which shots deserve full animation, which beats can be simplified, which transitions need redesign, and where budget should actually go. That is the real productivity gain in ai video generation gaming cinematics: fewer expensive surprises once final production starts.
How to Get Better Results and Lower Costs With AI Video Generation Gaming Cinematics

Prompting tips that improve cinematic output
Most bad outputs come from vague prompts. If you type “epic cinematic fantasy scene,” you are asking the model to guess everything that matters. Better prompts describe the shot the way a cinematic artist would brief it: camera angle, camera movement, lighting, mood, character action, environment, and duration. For example: “Low-angle medium-wide shot, slow dolly forward, cold moonlight with orange fire accents, exhausted armored knight kneels in ruined chapel, drifting ash in air, 6 seconds.” That gives the generator useful constraints.
Add visual rules from your look pack directly into the prompt when needed. Mention the palette, weather, time of day, texture level, or lens feel. If the scene needs continuity, repeat the approved character description exactly. If a clip is only for framing, say so by simplifying character action and emphasizing camera motion. Prompts should be precise enough that a teammate could understand the intended shot without seeing any reference image.
Ways to save time when iterating scenes
The cheapest iteration method is to batch prompts by scene objective instead of generating random one-offs. If the scene objective is “make the villain entrance feel inevitable and controlled,” generate five short variants aimed at that exact read. Compare them, pick the strongest direction, and only then test finer details like lens length or lighting color. That avoids spending credits and time on clips that solve different problems.
Generate multiple short tests instead of one long clip. Short clips are faster to review, easier to replace, and cheaper to iterate. If a ten-second scene has three beats, make three separate generation tasks first. Once the beats work independently, assemble them in the edit. Long single-pass generations often bury the one useful moment inside a lot of unusable motion.
The $4K–$6K per minute professional trailer benchmark is a helpful frame here. The point of AI is not merely to make “cheap video.” The point is to reduce wasted production effort during concept validation. If you can kill a weak trailer concept in one afternoon of AI previs instead of after paying for multiple polished revisions, the savings are real even if the final trailer is still finished by a traditional team.
Reuse approved assets aggressively. Keep a library of approved frames, reference clips, prompt templates, look descriptors, and character sheets. If one generated frame nails the mood of your sci-fi war room, use it as a starting point for adjacent shots. If one source video gives you a strong stealth walk cycle, feed that motion into related animation tests. Reusing proven material improves consistency and shortens iteration cycles.
This is also where local and open tooling can matter. If your team is exploring an open source ai video generation model or trying to run ai video model locally, iteration costs may shift from per-clip spend toward hardware time and setup complexity. That can be worth it for privacy-sensitive projects, but only if the model quality, commercial license, and maintenance burden make sense. Always confirm the open source ai model license commercial use terms before putting anything near a shipping production pipeline.
The winning habit is simple: define the shot clearly, test quickly, keep what works, and never regenerate from scratch if an approved frame or motion reference can anchor the next pass.
Conclusion
AI video for game cinematics is most powerful when it helps you make better decisions earlier. Use it to turn scripts into moving previs, key art into motion tests, and rough source footage into animation-ready references. Use it to build trailer concepts, cutscene drafts, and pitch videos that clarify direction before the heavy production work begins.
That is the practical edge of ai video generation gaming cinematics right now. It gives you faster previs, stronger internal alignment, and cleaner handoff into final cinematic production. When the scene objective is clear, the visual rules are locked, and the team treats AI as a planning accelerator instead of a magic final-output button, you get better shots, fewer wasted revisions, and much stronger cinematic direction from day one.