How to Run Image-to-Video AI Models Locally
If you want to run image to video model locally, the fastest path is choosing a model that fits your VRAM, setting it up in ComfyUI, and starting with a lightweight workflow before scaling up quality.
What You Need to Run Image to Video Model Locally

The minimum hardware that matters most
The first thing to understand is that local image-to-video generation is usually limited by GPU memory, not by storage space or even raw GPU branding. You can have a fast gaming PC and still hit a wall immediately if the model and workflow do not fit in VRAM. One research source puts the practical floor at about 24GB of VRAM minimum for a short 2-second stretched video at 16–24 FPS in heavier setups. That number is a great reality check because it explains why some image to video open source model checkpoints feel easy to download but impossible to run comfortably.
If your goal is to run AI video model locally without cloud credits, focus on the GPU before anything else. CPU and system RAM still matter for loading files and keeping the machine responsive, but they are secondary once video generation starts. A decent modern CPU, enough SSD space for models, and at least 32GB of system RAM make life easier, yet the GPU determines whether generation works at all.
Why VRAM is the first thing to check
VRAM is the first spec to check because if the model cannot fit, it will not run reliably. You might get an out-of-memory crash, frozen generation, black frames, or wildly unstable performance. The practical sequence is simple: fit first, speed second. After a checkpoint fits in memory, then you can care about how quickly it renders.
Research from Puget Systems highlights the three GPU specs worth comparing before you download anything:
- Total VRAM
- Memory bandwidth
- Floating point performance
That order matters. Total VRAM decides whether the workflow can load. Memory bandwidth affects how fast the GPU can move data around once the job starts. Floating point performance affects overall compute speed during inference. If you are comparing two cards and both can fit the same model, the one with stronger bandwidth and FP performance will usually feel much better in real use.
A practical local setup for beginners
For a beginner-friendly setup, the easiest path is still an NVIDIA RTX GPU. That is not because other hardware is impossible, but because most local visual AI tutorials, model guides, and ComfyUI workflows are written around RTX systems. When you are trying to solve your first missing-node error or VRAM issue at midnight, having the most common target platform saves time.
A practical starter build looks like this: an RTX card with as much VRAM as you can afford, current GPU drivers, 32GB or more of system RAM, a fast SSD, and Windows or Linux configured cleanly enough that ComfyUI can access the GPU without fighting background apps. If you only have 8GB to 12GB VRAM, do not start by chasing the biggest checkpoint you can find. Start with smaller, optimized, or quantized models. If you have 16GB to 24GB VRAM, you can explore stronger image-to-video options and longer tests, but you still need to stay conservative at first.
This is where many people waste time: they download a large open source ai video generation model, import a fancy workflow, push high resolution, and assume the GPU will somehow cope. It usually will not. The smarter move is to match model size to hardware from the start, then scale up only after you have one clean successful render.
Choose the Best Local Model for Your GPU
Best options for 8GB to 12GB VRAM
If you are working with 8GB to 12GB of VRAM, your best strategy is to favor smaller or optimized checkpoints and keep your first runs short. Based on the research notes, WAN2.2 5B is the practical starting point for lower-VRAM systems. It gives you a realistic chance to test local image-to-video generation without immediately crashing into memory limits. If available for your workflow, GGUF variants are worth serious attention because they can reduce memory pressure enough to make a difficult setup usable.
This is also where model discipline matters more than model hype. A lot of people see a powerful open source transformer video model getting great demos and assume the same checkpoint will run on a midrange gaming card. In practice, compressed or smaller variants are often the difference between “works tonight” and “spend three hours troubleshooting OOM errors.” For lower-VRAM systems, speed and reliability beat theoretical maximum quality every time.
LTX Video also deserves attention here because it is repeatedly described in the research as fast and powerful for local AI video generation. If your goal is smooth experimentation instead of brute-forcing the largest model, LTX Video can be a strong fit, especially when paired with a modest ComfyUI workflow and conservative clip settings.
Best options for 16GB to 24GB VRAM
With 16GB to 24GB of VRAM, you have room to be more ambitious. This is the range where local image-to-video stops feeling like a constant compromise and starts feeling practical. You can test stronger checkpoints, push more frames, and sometimes move up in resolution without instantly blowing up your workflow.
Research points to WAN2.2 14B as the better option if you have enough VRAM. Compared with the 5B version, it is the natural step up for higher-VRAM systems that want better fidelity or stronger motion generation. Even so, “higher-VRAM” does not mean unlimited. The 24GB VRAM minimum estimate for short 2-second outputs at 16–24 FPS in heavier setups is an important warning: even powerful consumer cards can get tight fast when clip length and resolution increase together.
In this range, LTX Video remains attractive if your priority is faster iteration. It may not replace every larger checkpoint in every use case, but it is often easier to work with locally. Fast iteration matters because the best workflow is usually the one you can test repeatedly without fear of wasting ten minutes on each failed render.
When to use larger checkpoints
Larger checkpoints make sense only when your hardware fits them comfortably and you already know the smaller setup is working. This is where people should remember a very useful reference point from general AI model sizing: one source notes that a 20B model in full precision typically requires more than 40GB of VRAM, with some users recommending 45GB to 48GB. That figure is not a direct promise about every video model, but it is a strong warning against assuming every large checkpoint belongs on a normal gaming GPU.
A simple decision framework works well:
- Pick the smallest model that fits comfortably.
- Test a very short clip first.
- Increase duration next.
- Raise resolution or quality settings after that.
- Only then consider a larger checkpoint.
This same logic applies whether you are testing WAN2.2, LTX Video, a broader image to video open source model, or even something niche like a happyhorse 1.0 ai video generation model open source transformer if it appears in your stack. Start from what fits, not from what looks most impressive on paper.
Set Up ComfyUI to Run AI Video Models Locally
Why ComfyUI is the recommended starting point
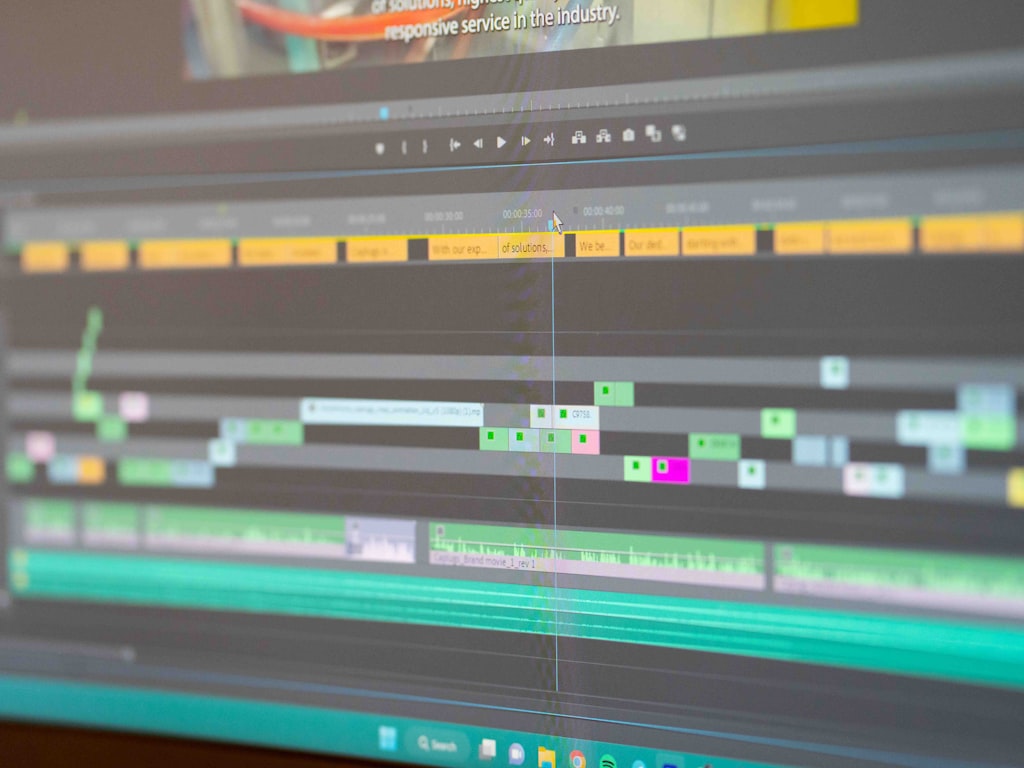
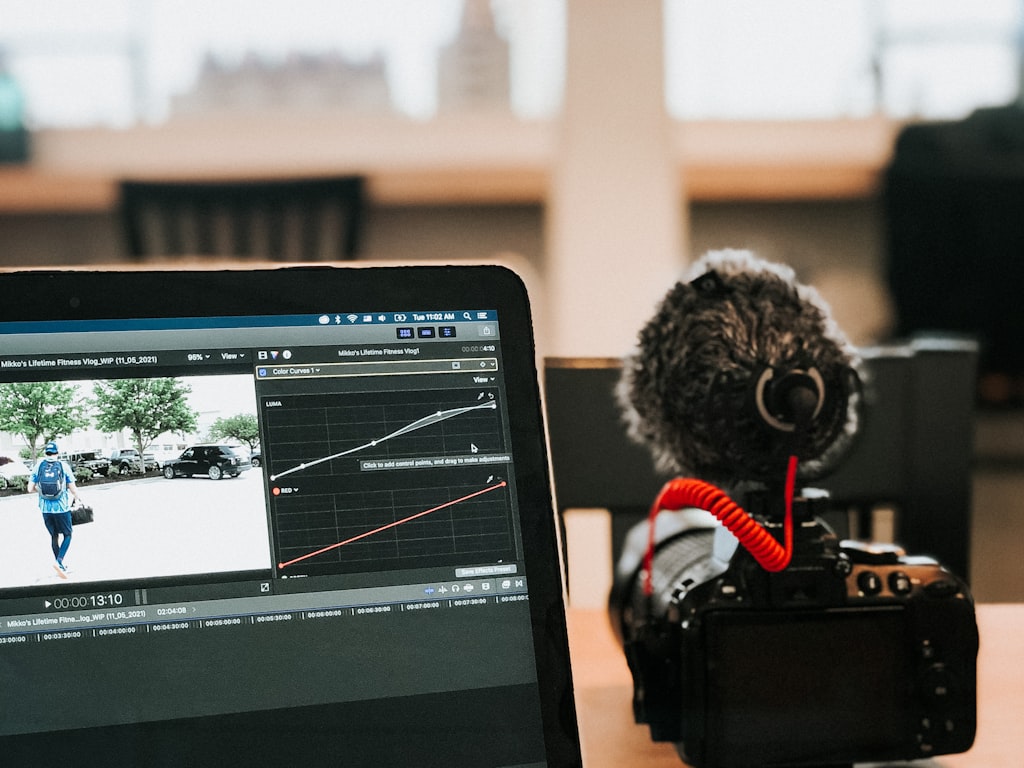
If you want the most practical path to run image to video model locally, ComfyUI is the best starting interface. It comes up repeatedly in the research as the local and offline workflow tool for image and video generation, and that lines up with real-world use: ComfyUI gives you a visual graph, easy node-level debugging, and enough flexibility to support very different model families without locking you into one app’s assumptions.
That flexibility matters because video workflows break in specific places. One node may be missing, a model loader may point to the wrong folder, or a sampler setting may be wrong for a checkpoint. In ComfyUI, you can see the pipeline step by step instead of guessing what a black-box app is doing behind the scenes.
Core components to install
The setup flow is straightforward if you keep it clean:
- Install or update your GPU drivers first.
- Install Python and required dependencies if your chosen ComfyUI build needs them.
- Install ComfyUI itself.
- Add any custom nodes required by the specific image-to-video workflow.
- Place model files in the correct folders so the workflow can find them.
Do not skip the driver step. Local video generation stresses the GPU hard, and old drivers can cause random crashes, failed CUDA loads, or poor performance. Once drivers are current, install ComfyUI from a trusted source and confirm it launches properly before adding extra model packs.
After that, organization matters more than people expect. Keep checkpoint files, VAEs, text encoders, motion modules, and custom nodes in the directories expected by the workflow. A lot of failed generations are not “bad models”; they are just bad file placement.
How to organize models and workflows
The real strength of ComfyUI is that workflows are modular. You can load an image, route it through an image-to-video model, adjust frame settings, and export output while seeing exactly which node does what. That makes it much easier to swap between WAN2.2 and LTX Video, or compare one open source ai video generation model against another without rebuilding everything from scratch.
A good habit is to create separate folders or naming conventions for each model family. For example, keep one tested workflow for WAN2.2 5B, another for WAN2.2 14B, and another for LTX Video. Save them as independent working setups. That is much better than trying to force one universal graph to support every checkpoint. Video models often have different loaders, node requirements, scheduler expectations, and memory behavior.
Also save a “known good” baseline version of every workflow before you start tweaking. If a custom node update breaks compatibility or a new workflow import fails, you can roll back instantly. This habit saves a massive amount of time when you want to run ai video model locally on a repeatable schedule instead of treating every session like a fresh experiment.
How to Run Image to Video Model Locally in ComfyUI
A simple first workflow
Your first successful workflow should be boring on purpose. Load a single input image, connect it to the appropriate image-to-video model loader, keep the output clip short, and generate a low-risk test. In ComfyUI, that usually means a graph with an image input node, model loader nodes, conditioning or prompt nodes if the workflow uses them, generation nodes, and a video output or save node.
The key is to prove your pipeline works end to end before you chase quality. If the graph loads, the model initializes, and you get a playable clip, you already have the hard part solved. From there, tuning is easy.
Settings to use for your first successful test
For the first test, use conservative settings across the board. Keep the clip length short, keep the resolution modest, and avoid maxing out sampler or inference steps. Since VRAM usage climbs quickly with more frames and bigger images, your first objective is not beauty; it is stability.
A practical starting pattern is:
- Short clip length
- Modest frame count
- Reasonable FPS target
- Lower resolution than your final goal
- Smaller model variant if available
That combination gives you the best chance of getting a valid output without crashing. If you are using WAN2.2, start with 5B on lower-VRAM systems. If you have more headroom, test 14B only after a smaller configuration is working. If you are using LTX Video, begin with whatever workflow is known to be lightweight and already tested by others on similar RTX hardware.
The settings worth tuning first are the ones that hit memory and render time most directly:
- Frames
- FPS target
- Resolution
- Sampler or inference steps
- Model variant size
If one test fails, change only one of those at a time so you know what actually fixed it.
How to increase quality without breaking your system
The safest upgrade strategy is staged. First, get any valid output. Then raise duration. Then raise quality. Then consider a larger model. That order keeps troubleshooting simple and prevents you from changing five variables at once.
For example, if your short low-resolution clip works, increase the frame count slightly or extend the duration a bit. If that still works, raise the resolution. If render time becomes painful but memory is fine, look at bandwidth and compute limitations rather than assuming the model is broken. If output quality still is not enough, increase sampler steps modestly or move to a larger checkpoint only if your VRAM margin is healthy.
This stepwise approach is how you run image to video model locally without turning every session into a crash test. It also helps you compare multiple models honestly. A smaller image to video open source model with fast, reliable output often beats a giant checkpoint that fails half the time.
Fix VRAM Errors, Slow Speeds, and Failed Generations
What to do when the model will not fit in memory
Out-of-memory errors are the most common failure mode in local AI video work, and the checklist is very direct. If the model does not fit in VRAM, it will not run reliably. No amount of optimism fixes that. Capacity comes before speed.
When you hit VRAM errors, try these in order:
- Reduce resolution
- Shorten clip length
- Lower frame count
- Switch to a smaller model, such as WAN2.2 5B
- Try a GGUF variant if your model family supports it
- Close other GPU-heavy apps
- Restart ComfyUI to clear stuck memory allocation
Those changes attack the biggest memory demands first. Resolution and clip length usually have the fastest impact. If that still is not enough, moving from a larger checkpoint to a smaller one is the cleanest fix.
How to speed up local generation
Once your workflow fits in memory, speed becomes the next concern. This is where the Puget Systems framing is useful: after VRAM fit is solved, memory bandwidth and floating point performance have a major effect on generation time. Two GPUs with enough VRAM can still feel very different if one has much better bandwidth or compute throughput.
There are also workflow-level ways to speed things up:
- Use shorter test clips while iterating
- Lower inference steps during previews
- Stick to smaller resolutions until final export
- Use faster model families like LTX Video when appropriate
- Avoid loading extra nodes or tools you are not using in the current workflow
If generation is slow but stable, that is usually a sign you have solved the hard part. Slow can be optimized. Unstable memory fit usually cannot.
Common workflow mistakes
A lot of “model problems” are really workflow mismatches. In ComfyUI, the most common issues are:
- Mismatched model files
- Missing custom nodes
- Unsupported workflow versions
- Wrong folder placement
- Using a workflow built for a different checkpoint
For example, a workflow designed around WAN2.2 14B may not behave correctly with a smaller or differently formatted variant if the loader expects another file structure. The same goes for trying to adapt a graph made for LTX Video or another open source transformer video model without checking node compatibility.
When a workflow fails, verify the basics before changing settings. Confirm the exact checkpoint name, confirm the required custom nodes are installed, and confirm the workflow was built for your model version. If a graph imports with red or broken nodes, fix that first. If output is blank or motion is strange, inspect the model-loading and conditioning steps before blaming the sampler.
The fastest way to stay sane is to keep one clean baseline per model. That gives you a trusted point of return whenever a new workflow, update, or custom node breaks your setup.
Best Practices for Running Open Source AI Video Models Locally
How to compare open source image-to-video models
When you compare an open source ai video generation model, use a practical scorecard instead of marketing clips. The five things that matter most are:
- VRAM fit
- Generation speed
- Output quality
- ComfyUI workflow support
- Whether it is built for image-to-video or broader video generation
That last point is important. Some checkpoints are tuned specifically as an image to video open source model, while others are broader video systems that can do more but may require a heavier setup. If your main task is animating still images, a focused image-to-video workflow often gives you fewer headaches than a giant general-purpose stack.
Also pay attention to workflow maturity. A model with strong ComfyUI support, clear node requirements, and tested RTX-based examples is usually more valuable than a theoretically better checkpoint with poor documentation.
When to use local generation instead of cloud tools
Local generation makes the most sense when you want offline workflows, privacy, fast experimentation, and freedom from per-generation cloud fees. That is especially true when you are doing repeated testing. If you are iterating through prompt changes, frame settings, image variations, and motion strength, cloud costs add up quickly. Local setup costs more upfront in hardware, but repeated use can become much cheaper.
Local also wins when you need control. You can save exact ComfyUI graphs, keep fixed model versions, and rerun the same workflow later with predictable behavior. That kind of repeatability is hard to beat when you are refining a style or building a reliable production pipeline.
Check licenses before commercial use
One practical note that gets overlooked: always check the open source ai model license commercial use terms before using outputs for business, client work, or productized content. “Open source” does not automatically mean unrestricted commercial rights. Some models allow broad use, some limit redistribution, and some restrict commercial deployment or derivative services.
The safest routine is simple: keep a text file with the model name, version, source link, and license summary for every checkpoint you install. That way you are not trying to reconstruct license terms later after a workflow becomes important.
Another best practice is to keep a small shortlist of tested local models instead of constantly switching. If you know that WAN2.2 5B works for light jobs, WAN2.2 14B works for stronger outputs on your higher-VRAM machine, and LTX Video works for faster iteration, you can build repeatable workflows around real hardware expectations. That is much more productive than collecting endless checkpoints you never fully test. Even if a newer open source transformer video model appears every week, a stable short list will get you better results faster.
Conclusion
The easiest way to run image to video model locally is to match the model to your VRAM, use ComfyUI as your control center, and begin with short lightweight tests before moving up to larger open source video models. If your GPU has limited memory, start small with something like WAN2.2 5B or a GGUF variant. If you have more headroom, explore stronger options such as WAN2.2 14B or faster local workflows built around LTX Video.
The pattern that works is always the same: make sure the model fits, build a clean ComfyUI workflow, generate a short clip, and only then scale duration, resolution, and quality. That approach saves time, avoids pointless VRAM crashes, and gives you a repeatable local setup you can actually trust.